RSS

Archiv der Kategorie: RPG Maker VX Ace Community

Video

Forenfusion – RPGMakerVXAce.de + RPGVX.net = RPGMaker-Reloaded.de!


Die beiden Foren RPGMakerVXAce.de und RPGVX.net haben sich zu einem großen Forum zusammengeschlossen.

Das neue Forum ereicht ihr über www.rpgmaker-reloaded.de

Hier dazu noch ein Video

Ich bin natürlich auch auf der neuen Webseite für euch da.

LG
Nefertari bzw. Cleo


Mehr als die zugelassenen 20 Maps in VX Ace Lite simulieren – für Anfänger

Schwierigkeitsgrad:

Da die Anzahl der möglichen Maps in der Lite Version sehr beschränkt (max. 20) ist, bietet es sich an, große Maps zu erstellen und darauf mehrere Räume zu erstellen.

Wichtig dabei ist, dass der neue Raum außerhalb der Sichtweite des Helden liegt. Daher müssen mind. 5 Felder zwischen den einzelnen „Maps“ liegen. Um unschöne dicke schwarze Felder neben den „Maps“ zu vermeiden, sollten die „Maps“ möglichst untereinander liegen und nicht nebeneinander. Desweiteren sollte darauf geachtet werden, dass die einzelnen „Maps“ auf einer Map ungefähr die gleiche Breite haben.

Die Ränder an der unteren Seite lassen sich leider nicht vermeiden.

Die Maps in diesem Screenshot sollen kein Beispiel für gutes Mapping sein.

Falls noch Fragen auftauchen sollte, scheut euch bitte nicht sie zu stellen.


Mehr als die zugelassenen 10 Türen simulieren in VX Ace Lite – für Fortgeschrittene

Schwierigkeitsgrad:

Wie ihr ja wisst, könnt ihr in der Lite Version nur 10 Events pro Karte verwenden. Das werden wir ändern mit Hilfe eines Fake Events:

Vorbereitung:

Die erste Datei „Door1_…“ importiert ihr in euren Charset Ordner. WICHTIG: Der Hintergrund muss schwarz bleiben also keine transparente Farbe markieren beim Importieren.
Die zweite Datei „Outside_D…“ importiert ihr in euren Tilesetordner. Dieses Tileset weißt ihr dem Tileset zu bei dem ihr die 10 Türen benötigt. Markiert die Türen bitte mit einem X (nicht passierbar) bei den Passierbarkeitseinstellungen.
Mappt eure Türen mit Hilfe des neu importieren Tileset D. Da wir nur ein Fake Event verwenden, müssen die Türen alle gleich sein.

Auf die Türen setzt ihr dann Region ID 1:

Als nächstes erstellen wir unser Fake Event irgendwo wo niemand hinkommt:

Damit sind wir mit den Vorbereitungen fertig.

Nun kommen wir zum entscheidenden Common Event:

Erstellt ein neues Common Event mit den folgenden Einstellungen:


Den soeben erstellten Switch müsst ihr unbedingt in eurem Intro anschalten (Control Switches).Unser Common Event soll nur laufen, wenn die Taste Enter gedrückt wurde:

In diese Bedingung kommt nun alles andere:
Nun müssen wir wissen wo unser Spieler steht. Daher fragen wir seine X und Y Koordinaten ab:

Das selbe macht ihr dann für die Y Koordinate.
Als nächstes müssen wir dafür sorgen, dass unsere Koordinaten den Wert der Tür kriegen (der Spieler bleibt stehen). Daher wird abgefragt in welche Richtung der Spieler schaut und die Koordinaten erhöhen bzw. verringern sich auf die Koordinaten der Tür.

Geht in die Bedingung. Jetzt werden die Koordinaten angepasst:

Das wiederholt ihr jetzt für jede Blickrichtung. Am besten ihr verschachtelt die Blickrichtungen mit Hilfe des Else Cases. Dann sollte das Ganze so aussehen:
Den Kommentar müsst ihr nicht machen. Er hat keinerlei Auswirkungen auf das Script.
Als nächstes erstellen wir uns eine neue Variable die die Region ID unserer Koordinaten enthält:

Als nächstes müssen wir abfragen ob die Variable Region ID den Wert 1 enthält:

Danach wird ein Sound Effekt abgespielt:

Dann wird unser Fake Event auf die Tür mit Hilfe unserer Koordinaten gesetzt:

Nun bekommt unser Event eine die Türgrafik (die wir importiert haben) zugewiesen und die Tür wird animiert:

Danach kommt nur noch der Teleport:

Das war’s auch schon. Fragen könnt ihr jederzeit gerne stellen.

 
Ein Kommentar

Verfasst von - 26. Dezember 2012 in RPG Maker VX Ace Community, Tutorials


Tutorial Custom Menu – Advanced Learners/ Eigenes Menü – Fortgeschrittene – Part 2

ACHTUNG: Für alle die des Englischen nicht so mächtig sind habe ich es hier noch einmal auf Deutsch hochgeladen: http://rpgmakervxace.de/board64-tutorials-ressourcen/board42-tutorials/

——————————————————————————————————————————————————————

Difficulty:

The next thing we have to do is to ensure that our cursor can move. For that we need another common event with the following settings:

Ashampoo_Snap_2012.12.21_17h38m44s_001_

It’s important that it’s set on autorun so our character can’t move.

Now we have to set up what happens when the button down is pressed:

Ashampoo_Snap_2012.12.21_18h16m59s_007_Conditional Branch In that conditional branch set the following: First a wait of 1 frame to prevent the menu of lagging. Second set a conditional branch for cursorposition 1:

Ashampoo_Snap_2012.12.21_18h20m03s_008_Conditional BranchIn that conditional branch set a sound effect for the cursor movement.

Ashampoo_Snap_2012.12.21_18h21m40s_009_SEThe next we have to do is to move the cursor in 64 pixel steps down like so:

Ashampoo_Snap_2012.12.21_18h23m37s_010_Move Picture Wait for completion is important to prevent the game of lagging. The last thing is to set the variable Cursorposition to 2:

Ashampoo_Snap_2012.12.21_18h26m09s_011_Control Variables

Now repeat that for cursorposition 2-4 and adjust the y coordinate in 64 steps and the variable cursorposition:

Ashampoo_Snap_2012.12.21_18h09m06s_002_

Repeat the whole thing (in the else case of the conditional branch before (button down)) for the condition if button up is pressed:

Ashampoo_Snap_2012.12.21_18h10m59s_003_

Now our cusor will move but we can’t actvate anything.

Now we have to decide what to do if button C (Enter or Spacebar) is pressed:

Put the following into the else case of the conditional branch (button up) before:

Ashampoo_Snap_2012.12.21_18h32m38s_012_Conditional Branch and another wait of 1 frame.

Now we play again a soundeffect:

Ashampoo_Snap_2012.12.21_18h33m43s_013_SE and to erase the pictures of the menu:

Ashampoo_Snap_2012.12.21_18h34m57s_014_Erase Picture Ashampoo_Snap_2012.12.21_18h35m07s_015_Erase Picture

Now we’ll call the Item menu with a „Call Script“:

Ashampoo_Snap_2012.12.21_18h36m14s_016_Script

And turn the switch Menu ON off:

Ashampoo_Snap_2012.12.21_18h37m50s_017_Control Switches

Repeat that again for each cursor position:

Ashampoo_Snap_2012.12.21_18h14m22s_004_Ashampoo_Snap_2012.12.21_18h15m10s_005_:

(You don’t need the conditional branch if cursorposition is 4 twice)

For cursorposition 2 fill the following in the call script: SceneManager.call(Scene_Equip)

The last thing we need to do is to set up the conditional branch for pressing Esc (B button). Set this conditional branch in the else case of the conditional branch (C Button) before:Ashampoo_Snap_2012.12.21_18h44m06s_018_Conditional BranchThen again a wait of 1 frame to prevent the game of lagging. The next command is again a soundeffect:Ashampoo_Snap_2012.12.21_18h47m03s_019_SE

Then we erase again the pictures 1 and 2:

Ashampoo_Snap_2012.12.21_18h34m57s_014_Erase Picture Ashampoo_Snap_2012.12.21_18h35m07s_015_Erase Picture

Wait again one frame and set the switch Menu ON on OFF:

Ashampoo_Snap_2012.12.21_18h37m50s_017_Control Switches

It should look like so:

Ashampoo_Snap_2012.12.21_18h15m28s_006_

And that’s all folks.

Cleo


Tutorial Custom Menu – Advanced Learners/ Eigenes Menü – Fortgeschrittene – Part 1

ACHTUNG: Für alle die des Englischen nicht so mächtig sind, habe ich das Tutorial nochmals auf Deutsch hier hochgeladen: http://rpgmakervxace.de/board64-tutorials-ressourcen/board42-tutorials/

—————————————————————————————————————————————————————-

Difficulty:

Today I’d like to show you how to make you own custom menu. For following this tutorial you should be familiar with common events, switches, variables, pictures and button inputs.

The first thing we’ll do is to open our graphic progamm (in my case Photoshop) and make a new document with the measurements of our screen (in my case 544 x 416 Pixel)

Ashampoo_Snap_2012.12.02_22h06m24s_004_Neu

In this document we’ll make a menu screen like so:

Menüpunkte

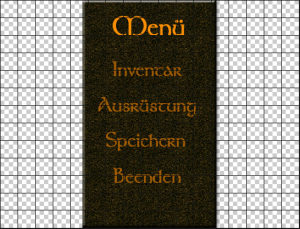
First mark a rectangle and fill it with every colour you like. With the filloptions (as shown in the first part of the hunger, thirst etc. tutorial) you can give it a pattern you like, as well as a relief. Make a new layer and write the points of your menu. (In my case Item, Equipment, Save, End) If you like you can make a title. Save this as a png with the name menu in your pictures folder of your project or elsewhere you like.. Of course you can save the single cut out menu points separately if you like but this would be a bit too complex for this tutorial.

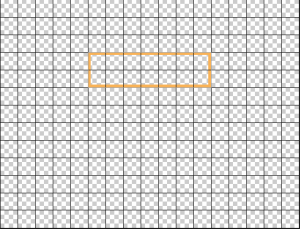
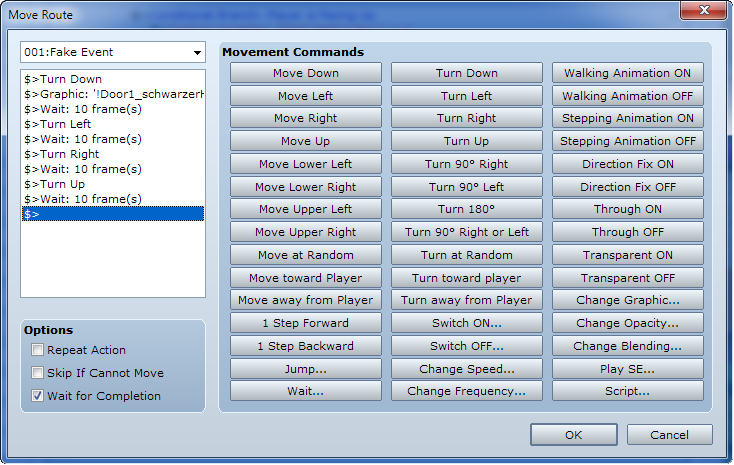
The next thing we’re gonna do is to make a cursor. Make a new layer. You’ll need the rectangle tool with the following settings for it:

Ashampoo_Snap_2012.12.21_12h19m26s_004_

Then our cursor will look like so:

Menü Draw it on the first menu point.

CursorThe cursor is 64 pixel high – that’s important for later.

Blend all out until only the cursor is left. You don’t need to cut it out. Save this as a png with the name cursor in your pictures folder of your project or elsewhere you like.

Now we’re done with creating the graphics. The next thing we’ll do is to open our project in the maker. If you haven’t saved your graphics already in the pictures folder you should import them now into your project.

Because we don’t want to have the default menu we need disable the menu access. Go to the first map in you project and in your intro event (set to autorun) and make the following:

Ashampoo_Snap_2012.12.21_14h47m03s_001_Change Menu Access 
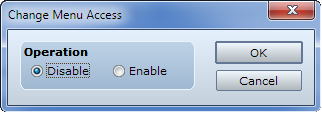
So if you start you game you won’t be able to call the default menu with the button Esc.

In this event we’ll activate as well the switch Menue enables. Of course you can activate the switch somewhere else in your game.

Ashampoo_Snap_2012.12.21_15h08m00s_006_Control SwitchesAshampoo_Snap_2012.12.21_18h52m20s_020_

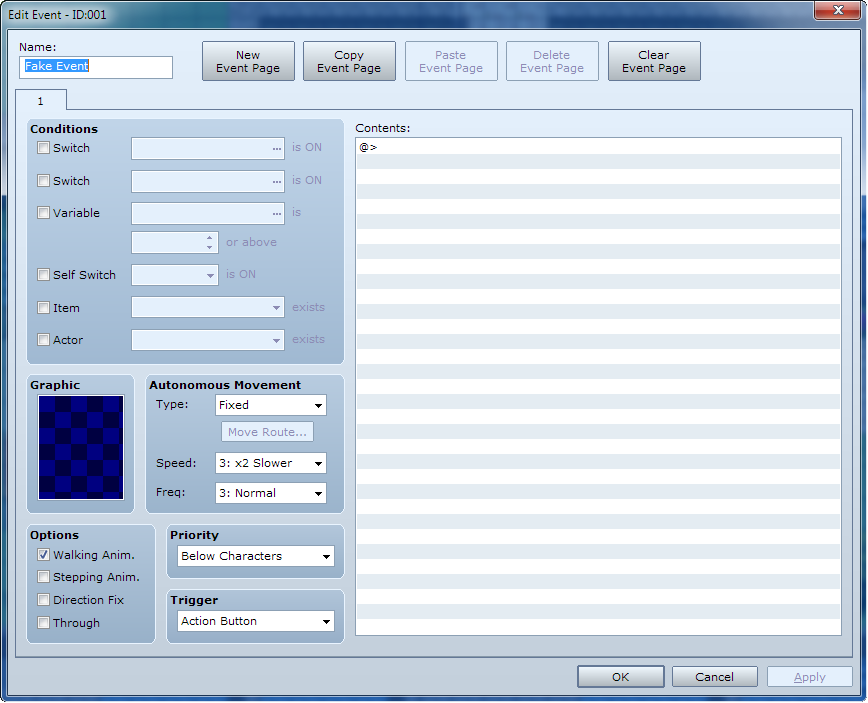
Erase the event if it’s on your intro map. If not you should set a selfswitch on and make with the condition of the selfswitch a second empty page with trigger action button

Now we need a common event for the predefintions: Set it to parallel process, because we must be able to call our menu every time. The switch should be Menu enabled. Ashampoo_Snap_2012.12.21_14h58m14s_002_

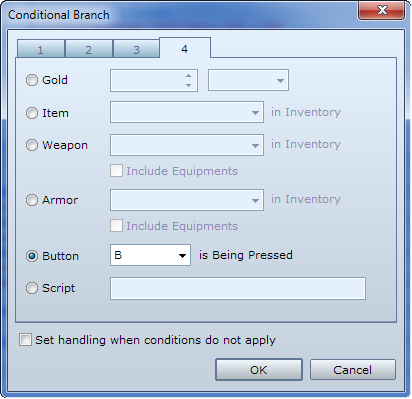
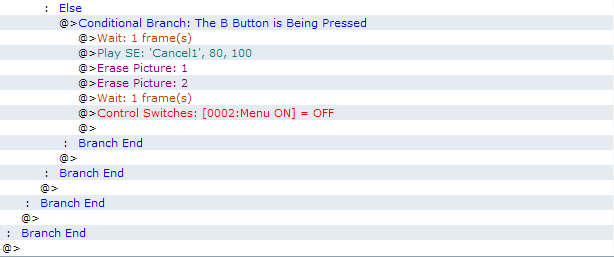
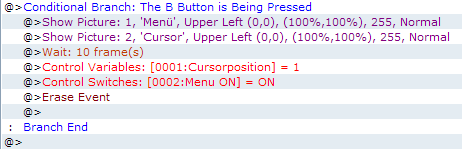
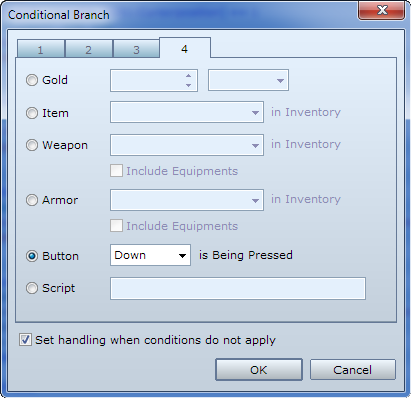
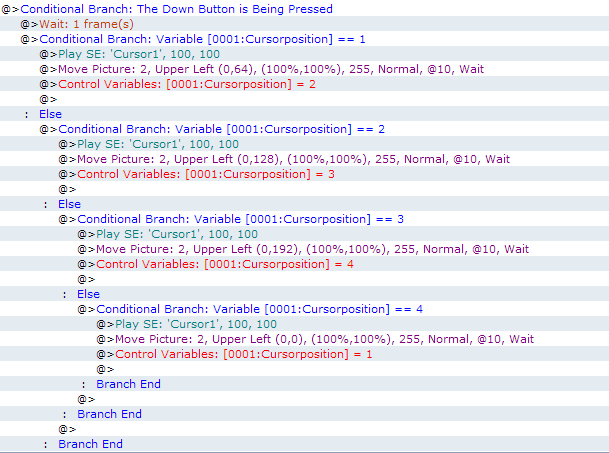
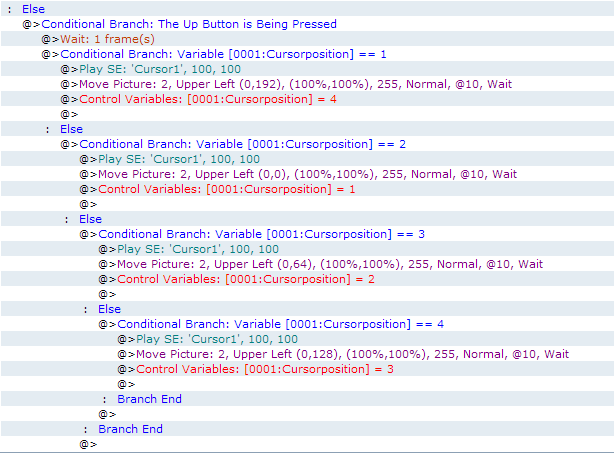
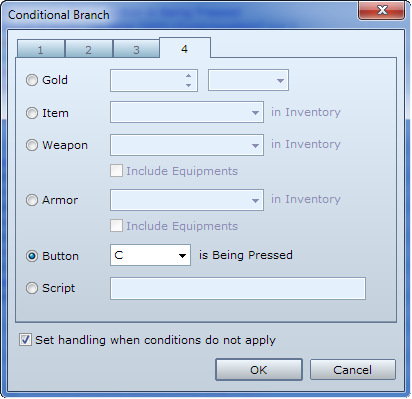
We want that our menu appears when we press the button Esc. Because of this we must make a conditional branch which asks if the button B is pressed:Ashampoo_Snap_2012.12.21_14h59m51s_003_Conditional Branch

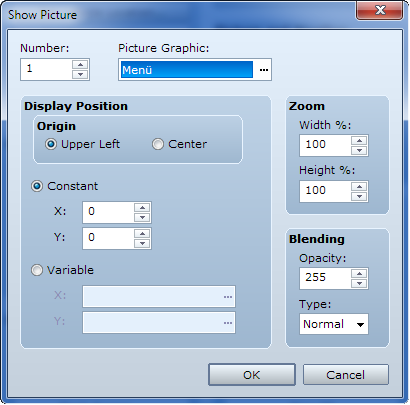
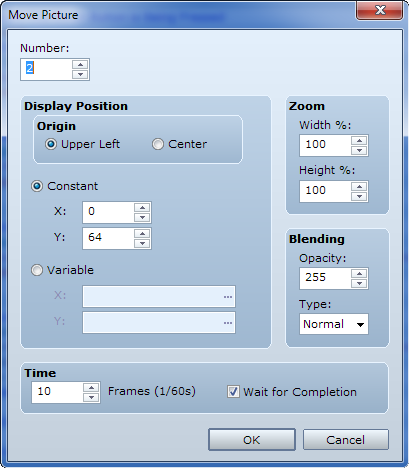
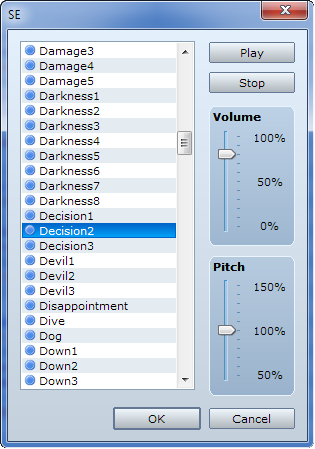
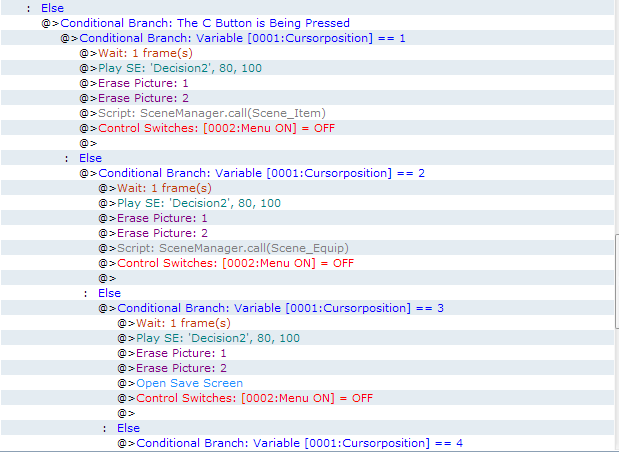
If so, our menu shall open. Because of this we make 2 show pictures commands in the conditional branch. Please pay attention that the cursor has the highest number.

Ashampoo_Snap_2012.12.21_15h02m39s_004_Show Picture Ashampoo_Snap_2012.12.21_15h03m46s_005_Show Picture
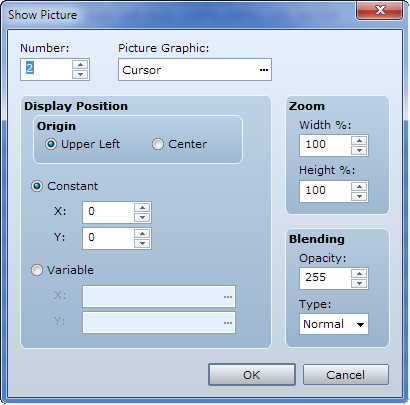
Now if we press Esc our menu should appear in the game – but nothing else.

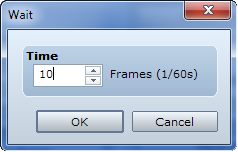
For preventing the game of lagging we’ll insert a wait command of 10 frames. If you’ve already pictures in your game – a hud for example – you should ensure that the picture numbers of the menu are the highest.

Ashampoo_Snap_2012.12.21_15h10m45s_008_Wait

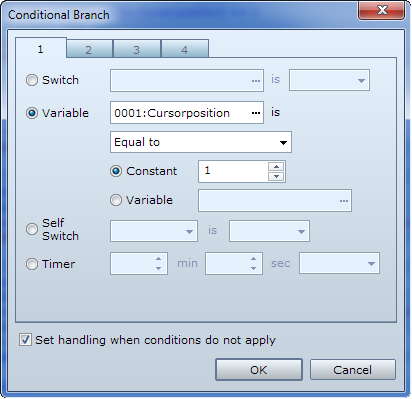
Because our cursor is already on position 1 we should fix this in variables:

Ashampoo_Snap_2012.12.21_15h12m55s_009_Control Variables 
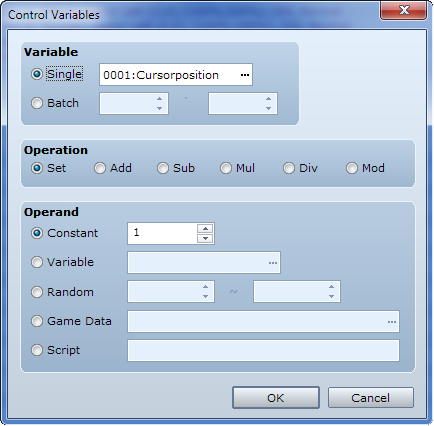
Our cursorposition is 1.

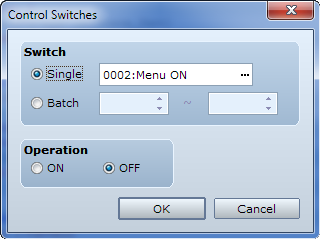
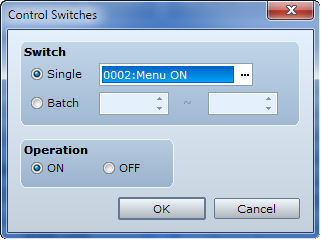
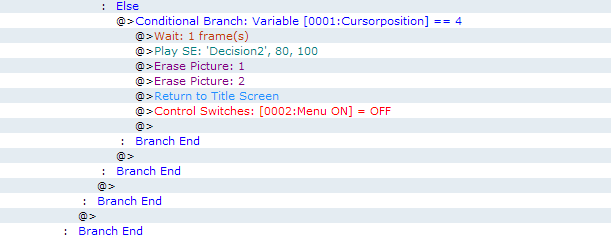
Now we need to activat a switch which will activat our next common event: Menu ON

Ashampoo_Snap_2012.12.21_15h13m19s_010_Control Switches

To prevent the common event to repeat itself we erase the it. It should look like so now:

Ashampoo_Snap_2012.12.21_15h15m28s_012_

And that’s it for now folks.


Eine neue RPG Maker VX Ace Community entsteht

Im Moment bin ich dabei mit Sheano eine neue RPG Maker VX Ace Community aufzubauen. Ihr findet sie unter folgender Adresse: http://rpgmakervxace.de/

Wenn ihr Interesse und Zeit habt, dann schaut doch einfach mal vorbei. Wir würden uns sehr freuen, euch als Besucher oder sogar als neue Mitglieder begrüßen zu dürfen.

Dort findet ihr bereits einige Tutorials von Sheano und mir sowie einige Ressourcen eigenhändig erstellt von unserem genialen Sheano und ein paar Edits von mir.

Sheano bietet auch eine Logo und Windowskin Werkstätte an.

Wir freuen uns auf Euch.

LG

Eure Cleo oder auch im deutschsprachigen Raum Nefertari

und Sheano

 
Hinterlasse einen Kommentar

Verfasst von - 15. Dezember 2012 in RPG Maker VX Ace Community